
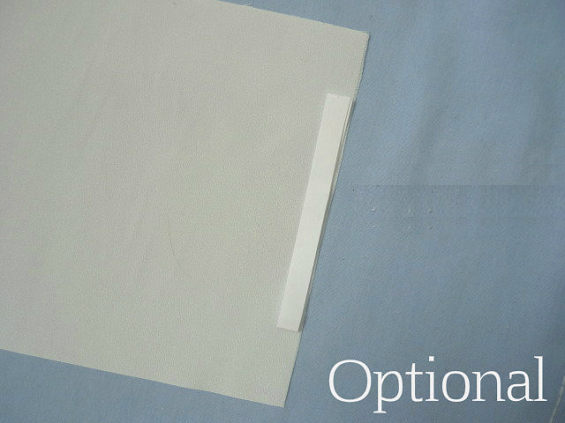
Traditionally smocked balls are made by smocking a strip of fabric and then fitting it to a foam ball. I tried that once but I didn't like the obvious seam where the two ends of the strip met. (Click here to see a photo of an ornament with an obvious seam.) Since 1988 I have been making my smocked ball ornaments by gathering a fabric tube onto a foam ball and then smocking "in the round". In 2004 I published a website (freewebs.com/bonimoo) with illustrated instructions of my method. By 2012 I had fine tuned many parts of my method so I decided to create an updated tutorial. Click on the following link or the photo below to visit My Seemingly Seamless Smocked Ball Ornaments tutorial.

Below are additional notes about making seemingly seamless smocked ball ornaments. (Some of these notes also appear in a condensed or expanded form on the tutorial.)
BALL CHOICE.
I prefer the smooth balls (expandable polystyrene) over the ones that feel like sand paper (extruded polystyrene foam) because the fabric slides more easily.

But either works well. Though I have previously used 3 inch styrofoam balls I now mostly like to use 2-1/4" to 2-1/2" (55mm to 60 mm) balls.
FABRIC CHOICE.
Woven cottons like those sold for quilting pleat very well.
Synthetics that don't hold a crease can be more challenging so when I use them I like to gather the fabric very tightly and steam the pleats. Usually this is done with a steam iron but prefer to use my microwave.

The ornaments below both have the same number of pleats but the pleats on the one on the left were steamed before I fit the fabric to the light bulb.

I have used batiste, but even though I steamed the pleats I found that the fabric was too soft to make nice crisp pleats. If I use it again I will use more pleats per inch so that the pleats are jammed together side by side.

MAKING THE FABRIC STRIP
The fabric strips should be on the straight grain of the fabric. If I start with a piece of fabric that is torn across the width, from selvedge to selvedge, I know I have the straight grain. The strip should have its long edge on, or parallel to, this torn edge.
WIDTH OF FABRIC STRIP
The width of my finished fabric strip is half the circumference of the ball minus approximately 3/8 inch. The 3/8 inch is the little circle at the top and bottom of the ball that will not be covered by fabric.

I found that 3/8" holes work well for 2-1/4" to 2-1/2" balls with quilting fabric pleated at approximately 14 pleats per inch. When I use bigger balls, thicker fabric or many more pleats per inch I may need to trim the fabric edges to get the fabric to lay flat on the ball. This results in bigger holes and bigger holes require bigger embellishments to cover them. Which isn't a problem because there are so many options to cover these holes. (See below.)
I don't fuss with a tape measure when I need to figure out the width of my finished fabric strip. I just use a strip of paper to measure my ball. I mark the cross over spot with a pin,

and cut off the excess.

Then I fold the paper strip in half and snip off about 3/8" of an inch.

I use the folded strip of paper to mark the correct width for my fabric strip.

If I will need to wash the fabric, to remove marking lines, I initially cut my strip wider than this measurement and I cut it to size after it is washed and dried.
LENGTH OF FABRIC STRIP
For most traditional smocking you gather a piece of fabric that is 3 times the width of the finished work.
When I made these 3 inch ball ornaments in 1988 I cut my fabric three time the circumference of the ball.

Though I still use 3 times the circumference as a rough guide to determine the length of my fabric strips the exact measurement is based on how many pleats I want on the ornament.
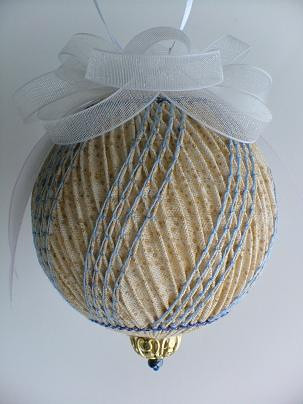
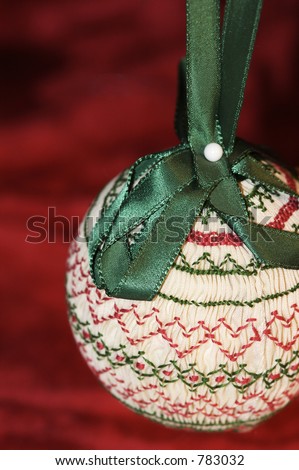
In 2004 I discovered, through trial and error, that I like to make my balls with approximately 14 pleats per inch at the equator. (The white ball I made in 1988 has approximately 16 pleats per inch. The blue print ball pictured below has approximately 11.5 pleats per inch; the red print ball has approximately 14 pleats per inch.)

My 2-1/4 inch balls have a circumference of approximately 7 inches. 7 inches x 14 pleats per inch = 98 pleats. Because I smock in the round I want the number of pleats to be an exact multiple of the number of pleats in the pattern repeat. Basic smocking stitches repeat every 4 pleats (some patterns have a longer repeat) so I could use 96 or 100 pleats on my 2-1/4 inch balls. I use the traditional pleat spacing of 3/16 inch. So if I choose to use 96 pleats my strip would need to be 96 x 3/16 inch = 18 inches plus seam allowances. (The spacing on pleating machines is different so the calculation for machine pleated fabric would be different.)
But I don't do the math or measure my strip with a tape measure. I just mark and make the desired number of pleats.
MARKING OPAQUE FABRIC
I don't have a source of pre-pleated fabric so when I use opaque fabric I have to use iron on dots (eg. Knotts Dots) or lightly draw a grid on the wrong side of my fabric. If I use dots I need one more dot than the desired number of pleats. (For example 96 pleats requires 97 dots.)
If I don't think that the dots will show up well on my chosen fabric, or if I'm concerned that the dots will show through to the right side even after washing, I lightly draw the grid on the back of my fabric. To make this easier I created 3/16" x 5/16" graph paper at incompetech.com (This is the spacing used on smocking dots.) If you would like to print some of this graph paper click on the link below. (When you print the paper make sure that the page scaling is set to "None".)
Traditional Smocking Grid
I have two pieces of the graph paper taped to my work surface. I lay my strip of fabric (right side down) on top of the papers so that the grid shows on all sides of the fabric. I adjust the fabric so that it parallel to and centered on the horizontal lines. If I'm marking an uneven number of gathering lines the horizontal center of the fabric is on a line. If I'm marking an even number of gathering lines the horizontal center of the fabric is between two lines. I tape the fabric to the paper,

and then use straight edges to draw the vertical,

and horizontal grid on the fabric.

If I use a light touch and a soft pencil the lines will wash out later. One could also use marking pens that wash out, or magically disappear in 24 hours. (In my experience these pens dry out very quickly and I read that sometimes the lines may reappear if the finished project is subjected to extreme temperatures.)
MARKING SEMI-TRANSPARENT FABRIC
When I am using fabric that is somewhat semi-transparent I use a reusable vinyl covered grid. To make this grid I printed a piece of my grid paper,

cut it in half,

removed one of the margins,

taped the two pieces together

and covered them with clear adhesive vinyl.


Then I trimmed the adhesive vinyl to the the edge of the paper.

To use my strip of paper I baste a fabric strip (right side down) to the grid. Again, if my smocking design has an uneven number of gathering lines I would place the horizontal center of the fabric strip on a line of the grid and if my design has an even number of gathering lines I would place the horizontal center of the fabric strip midway between two lines of the grid (If my fabric is between my eyes and a good light source I can see the lines through even fairly opaque fabric.)

MAKING THE GATHERING LINES
To make my gathering lines I use good quality thread. I like to use thread that matches the fabric for any gathering lines that won't be removed and thread that contrasts with the fabric for any threads that will be removed. I make a big knot in the end of the first gathering thread and insert the needle from the right side of the fabric. (When I'm using the printed grid the knot is between the printed grid and the fabric.) Then I make a small stitch at each dot or intersection of the grid.

When I have the desired number of long stitches (each long stitch = one pleat) I poke the needle through to the right side of the fabric. (If I'm using a printed grid I poke through the fabric and the grid.)

Then I make the other gathering lines. If the top and bottom grid lines are more than 1/4 inch from the edges of the fabric I make additional gathering lines 1/8 inch from the edges of the fabric.

SMOCKING THE ORNAMENT
My tutorial doesn't include general smocking instructions. The following page does,
http://tipnut.com/smocking/
I don't use patterns for my smocked balls. I just gather some fabric onto a ball and start playing. Sometimes I choose to smock a plain wide band around the ornament. For this one, worked over 100 pleats, I was able to use one line of continuous smocking, much like the orbit of some satellites, to encircle the ball with a mesh of diamonds.

For this one, worked over 96 pleats, I used a slanted feather stitch started on four adjacent pairs of pleats. I skipped two pleats and repeated.
Sometimes I like to make several bands of smocking so that the pleats between the rows form either parallel columns or honeycombed triangles. In the next photo the pleats above the center band formed parallel columns because the smocking in the two band used the same pairs of pleats. The pleats below the center band formed honeycombed triangles because the smocking in the band below is offset by one pleat.

I don't know of many sources for smocked ball patterns. The only ones I have found online are,
Six Christmas ornament designs from members of a smocking guild
I have also found the following sources:
There are some beaded ornaments by Mimi Ahern in the book "Creative Smocking" by Chris Rankin. (They are not on the cover of every edition.}
Dianne Durand's "Complete Book of Smocking Techniques and Projects" has instructions for one ball ornament.
The Spring 2007 issue of "A Needle Pulling Thread" magazine had some lovely smocked eggs.
You may also find inspiration from the photos I have found and posted on my Pinterest Smocked Project idea board.
If you know of any other sources of patterns for smocked balls I would greatly appreciate you adding them to the comments section below.
CHOOSING THE THREAD
Many smocking patterns call for two strands of embroidery floss, but I much prefer the look of a single strand of thread. In the photo below the gold is 2 strands of embroidery floss, the grey is Perle #12 and the white is Cordonnet #30.

I have also used (left to right in photo below) single strands of metallic thread, DMC Pearlescent thread or rayon embroidery thread to add a touch of sparkle to a ball.

EMBELLISHING THE BALL
The holes at the top and bottom of the ornaments can be covered with bead caps, sequins, covered or decorative buttons, bows, tassels, embroidered spiderweb, yoyos, ruched ribbon rosettes, crocheted circles, tatted motifs, etc.
In September and October 2012 I made 18 ornaments that I embellished with ribbon pansies and leaves.

I blogged about this project at,
http://pinponpanpro2012.blogspot.ca/
Here is a collage of photos that shows some of the ways I have finished the tops and bottoms of smocked ball ornaments. (Click twice on the photo to see a larger view.)

In July and August 2012 I played with making frayed fabric tassels. I've discovered that some fabric are more suitable for this than others and that on some fabric the horizontal threads make better tassels than the vertical threads. Here are two threads unravelled from some fine polyester crepe fabric. The vertical threads, the ones parallel to the selvedge are fuzzier than the horizontal threads. In the photo below I pulled both of the threads between my fingernails. The horizontal one is on the left.

To make a smocked ball with a frayed fabric tassel from this fabric I cut the strip so that the long edges of the strip were parallel to the selvedge. I made all of my gathering lines and frayed the bottom of the fabric to within 1/8 of an inch of the bottom gathering line. (It is much easier to do this in 2 or 3 sections than it is to fray the whole width of fabric. To do so I carefully cut the fabric from the bottom and stopped about 1/8 from the bottom gathering line. I was very careful not to to cut any of the threads that are parallel to the scissor blades.) Then I gathered the fabric strip.

I ladder stitched my seam to make my tube,

threaded each of my bottom gathering thread ends onto a needle and used it to catch the tops of each pleats until the thread ends met about halfway around the tube. I pulled on the thread ends to gather the ornament at the bottom,

and inserted my ball.

I pulled the ends of the bottom gathering threads to make a tight circle and tied them together. (Through trial and error I discovered that it was better to do the bottom first rather than to do the top first and end up with a the frayed threads too high or too low to make a nice tassel.)

Then I was ready to gather the top of the ornament and proceed as usual.
If you haven't already done so, please visit My Seemingly Seamless Smocked Ball Ornaments tutorial by clicking on the photo below.
 Pinwheel 2012
Lindo
ReplyDeleteAustralian Smocking & Embroidery Issues 2, 13, 18 and 41 have patterns and instructions for Christmas Balls
ReplyDeleteGorgeous! I hope someday I will be patient enough to try this. Right now it seems overwhelming to me.
ReplyDeleteDebra Fischer Fischopal@yahoo.com
Have you ever smocked Easter eggs??
ReplyDeleteThis comment has been removed by a blog administrator.
ReplyDeleteThis comment has been removed by a blog administrator.
ReplyDeleteHow could I determine which pleater I should get either the 32 row or 24 row ? I want to be able to make christmas and easter ornaments along with baby items (move to bigger projects later on).
ReplyDeleteThis tutorial is very helpful.
ReplyDelete